이하의 정보는 Ubuntu VM상에서 OpenStack의 개발 버전인 DevStack을 설치하는 방법을 다룹니다.
본 정보는 이하의 웹 페이지의 내용을 기반으로 이동하여 작성되었을을 밝히며 문제가 될 경우에는 삭제될 수 있습니다.
https://ubuntu.com/openstack/install
Install OpenStack yourself on Ubuntu. | Ubuntu
A step-by-step guide to OpenStack installation. You only need your workstation to get started.
ubuntu.com
단일 노드 VM에 MicroStack 설치하기
MicroStack은 OpenStack의 단일 구현체로서 쉽게 설치하고 관리하기 쉽게 만들어 줍니다. MicroStack 홈페이지에서는 OpenStack의 모든것을 제공해 주지는 못하지만 일반적인 테스트나 개발을 위해서는 사용할 수 있으며 특히 Kubernetes와 함께 사용하기에 적합한 구현체라고 소개 하고 있습니다. 현재의 MicroStack은 베타 버전이므로 테스트 용도로만 사용하는 것이 적합하며 실제 서비스에 이를 이용하는 것은 지양하기 바란다.
PS. OpenStack의 테스트 환경으로 DevStack과 MicroStack 두가지를 사용할 수 있다. 이는 사용자의 선택의 문제이다. 다만 DevStack은 릴리즈 된지 오래된 관계로 다양한 문제가 있으며 실제 OpenStack을 배포하는 용도로도 사용할 수 있다고 한다.
설치
Microstack은 snap 명령어를 이용하여 간편하게 설치 가능하다.
Requirements:
Ubuntu 18.04 LTS or Ubuntu 20.04 LTS 가 실행되고 있는 8GB 이상의 메모리와 100GB의 디스크 공간을 가진 다중 코어 VM이나 물리 서버에서 동작 한다.
먼저 snap을 베타 채널로 해서 microstack을 설치한다.. (snap은 ubuntu의 패키지 설치기로 기본으로 설치되어 있을것이다. 설치 되어 있지 않다면 검색을 통해서 수동으로 설치 한다.)
sudo snap install microstack --beta
snap에 등록된 microstack의 버전을 확인한다.
snap list microstack
Name        Version  Rev  Tracking     Publisher   Notes
microstack  ussuri   245  latest/beta  canonical✓  -
실제 microstack의 설치는 아래의 명령어를 통해서 간략하게 초기화 하는것으로 설치가 완료 된다. 모든 설정은 자동으로 구성된다.
sudo microstack init --auto --control
% 위와 같이 설치할 경우 cinder의 디바이스 할당이 설정되지 않아서 볼륨생성이 되지 않는다. 이럴 경우 다른 이미지를 제대로 올릴수 없기 때문에 아래와 같이 설치한다.
sudo snap install microstack --devmode --beta

sudo microstack init --auto --control --setup-loop-based-cinder-lvm-backend \
  --loop-device-file-size 50

sudo tee /var/snap/microstack/common/etc/cinder/cinder.conf.d/glance.conf <<EOF
[DEFAULT]
glance_ca_certificates_file = /var/snap/microstack/common/etc/ssl/certs/cacert.pem
EOF

sudo snap restart microstack.cinder-{uwsgi,scheduler,volume}
위의 명령어들은 베타와 개발 모드로 설치하고 초기화 할때 Cinder Loop Device 를 지원하고 50GB를 할당하도록 설정한다.
Instance의 실행
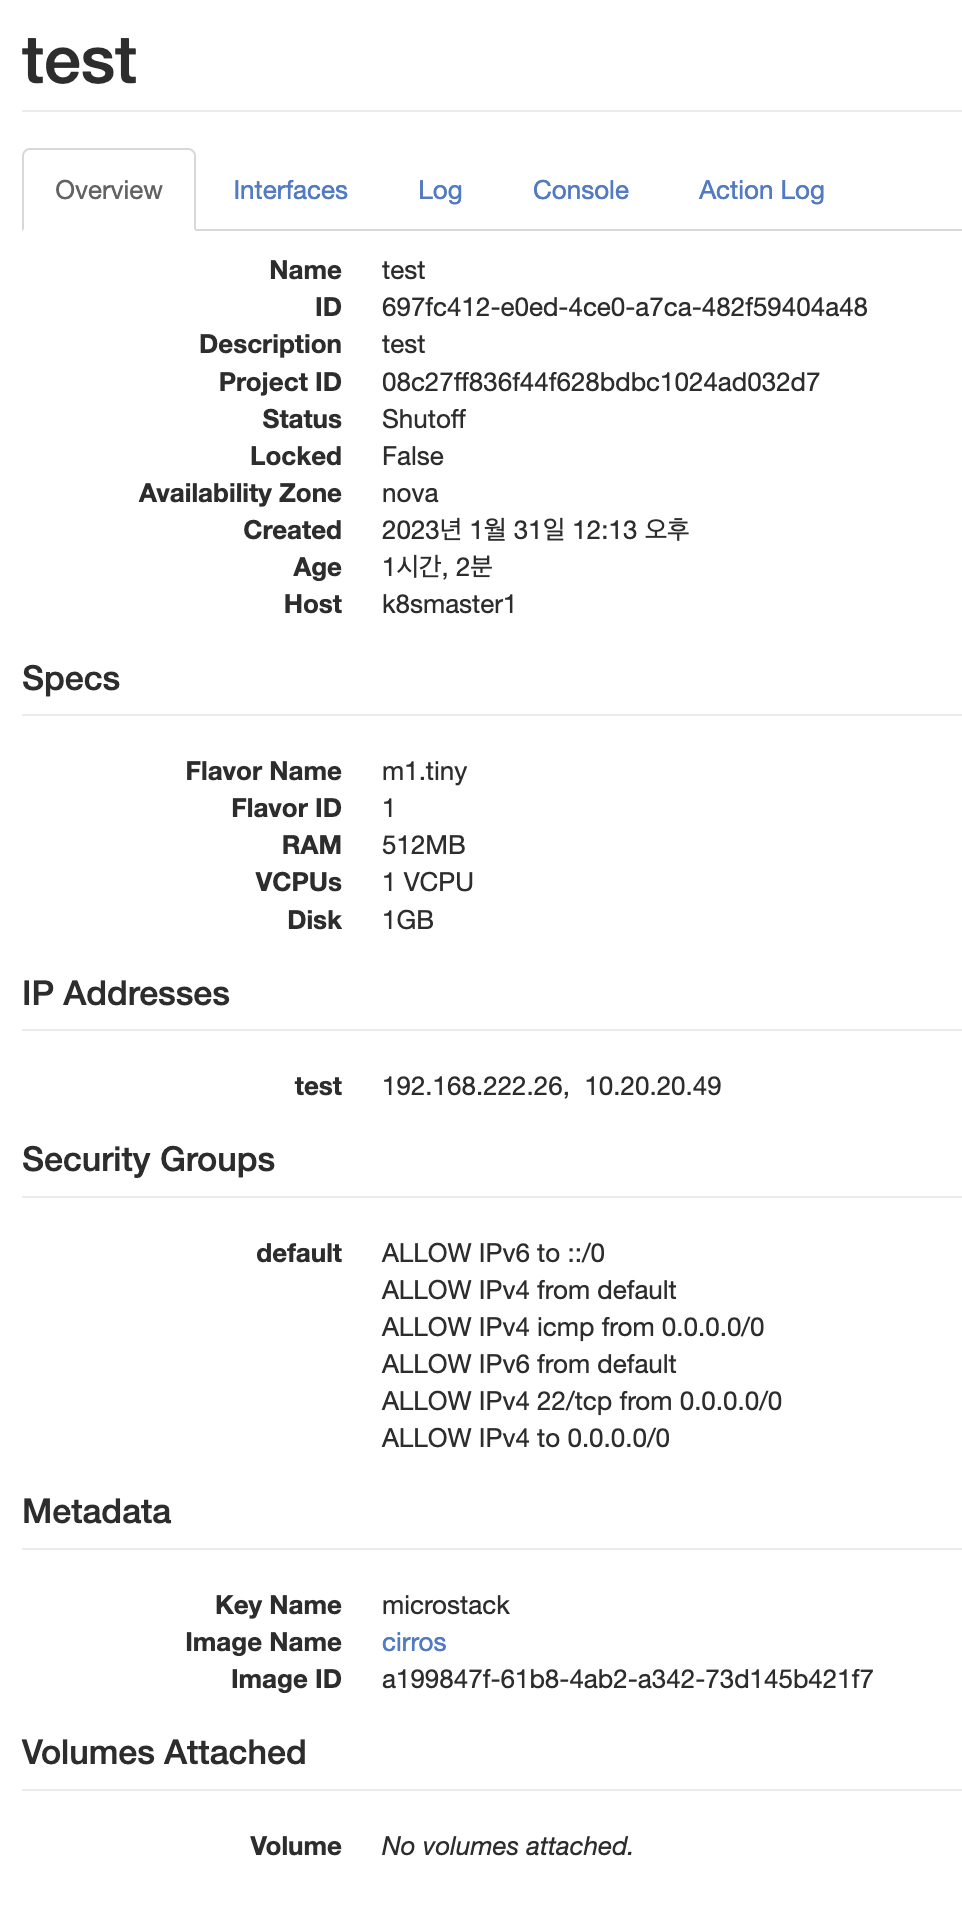
이제 설치가 되었으므로 간단하게 microstack의 Instance를 만들어 보겠다. 조건은 아래와 같다.
- keypair ‘microstack’
- flavor ‘m1.tiny’
- floating IP address on subnet ‘10.20.20.0/24’
To create an instance named ‘test’ based on the ‘cirros’ image:
microstack launch cirros -n test
The microstack launch command also supports arguments --key, --flavor, --image, and --net-id, in which case you will need to create objects using the standard client if non-default values are desired.
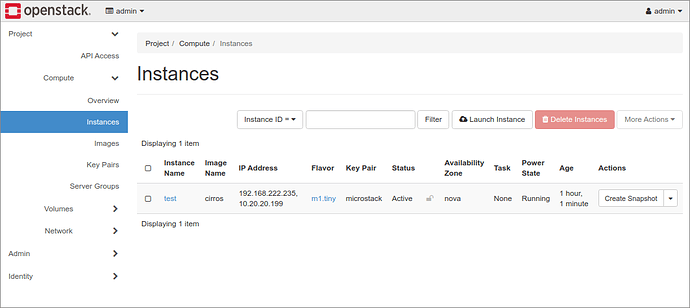
실제 만들어진 Instance를 UI에서 조회하면 아래와 같이 생성되어 있다.
위와 같은 경우 아래의 명령어를 통해서 해당 인스턴스에 접속할 수 있다.
Access the instance using the private SSH key associated with the default keypair:
ssh -i /home/ubuntu/snap/microstack/common/.ssh/id_microstack cirros@10.20.20.199
sokoban@k8smaster1:~/snap/microstack/common/.ssh$ ssh -i /home/sokoban/snap/microstack/common/.ssh/id_microstack cirros@10.20.20.49

The authenticity of host '10.20.20.49 (10.20.20.49)' can't be established.
ECDSA key fingerprint is SHA256:0127VyiAjGhpTU5E+Zl8CEWoA6FJcPMc/1a2pkWqAxU.
This key is not known by any other names
Are you sure you want to continue connecting (yes/no/[fingerprint])? yes
Warning: Permanently added '10.20.20.49' (ECDSA) to the list of known hosts.
sign_and_send_pubkey: no mutual signature supported
cirros@10.20.20.49's password:
위와 같이 패스워드 입력창이 나올 경우에는 아래와 같이 입력하면 접속할 수 있다. ( -o "PubkeyAcceptedKeyTypes +ssh-rsa" 추가)
sokoban@k8smaster1:~/snap/microstack/common/.ssh$ ssh -o "PubkeyAcceptedKeyTypes +ssh-rsa" -i /home/sokoban/snap/microstack/common/.ssh/id_microstack cirros@10.20.20.49
$
OpenStack 대시보드에 접속 하기
위의 설치 과정을 완료 하였다면 이제 OpenStack의 대시보드 UI에 접속할 수 있다.
https://10.20.20.1
사용자 이름은 'admin' 이고 패스워드는 아래의 명령어를 CLI에 입력하면 패스워드를 얻을수 있다.
sudo snap get microstack config.credentials.keystone-password
OAEHxLgCBz7Wz4usvolAAt61TrDUz6zz
이미지 추가하기
기본으로 Microstack을 설치하면 CirrOS라는 리눅스 배포판이 포함되어 있는 다만 이는 최소화된 리눅스 배포판으로 실제 구성을 테스트 하기에는 부족함이 있다. 그러므로 이미지를 추가해 준다.
https://docs.openstack.org/image-guide/obtain-images.html
Get images — Virtual Machine Image Guide documentation
Get images The simplest way to obtain a virtual machine image that works with OpenStack is to download one that someone else has already created. Most of the images contain the cloud-init package to support the SSH key pair and user data injection. Because
docs.openstack.org
이미지는 위의 사이트에서 찾을수 있으므로 본인이 원하는 이미지로 다운로드 한다.
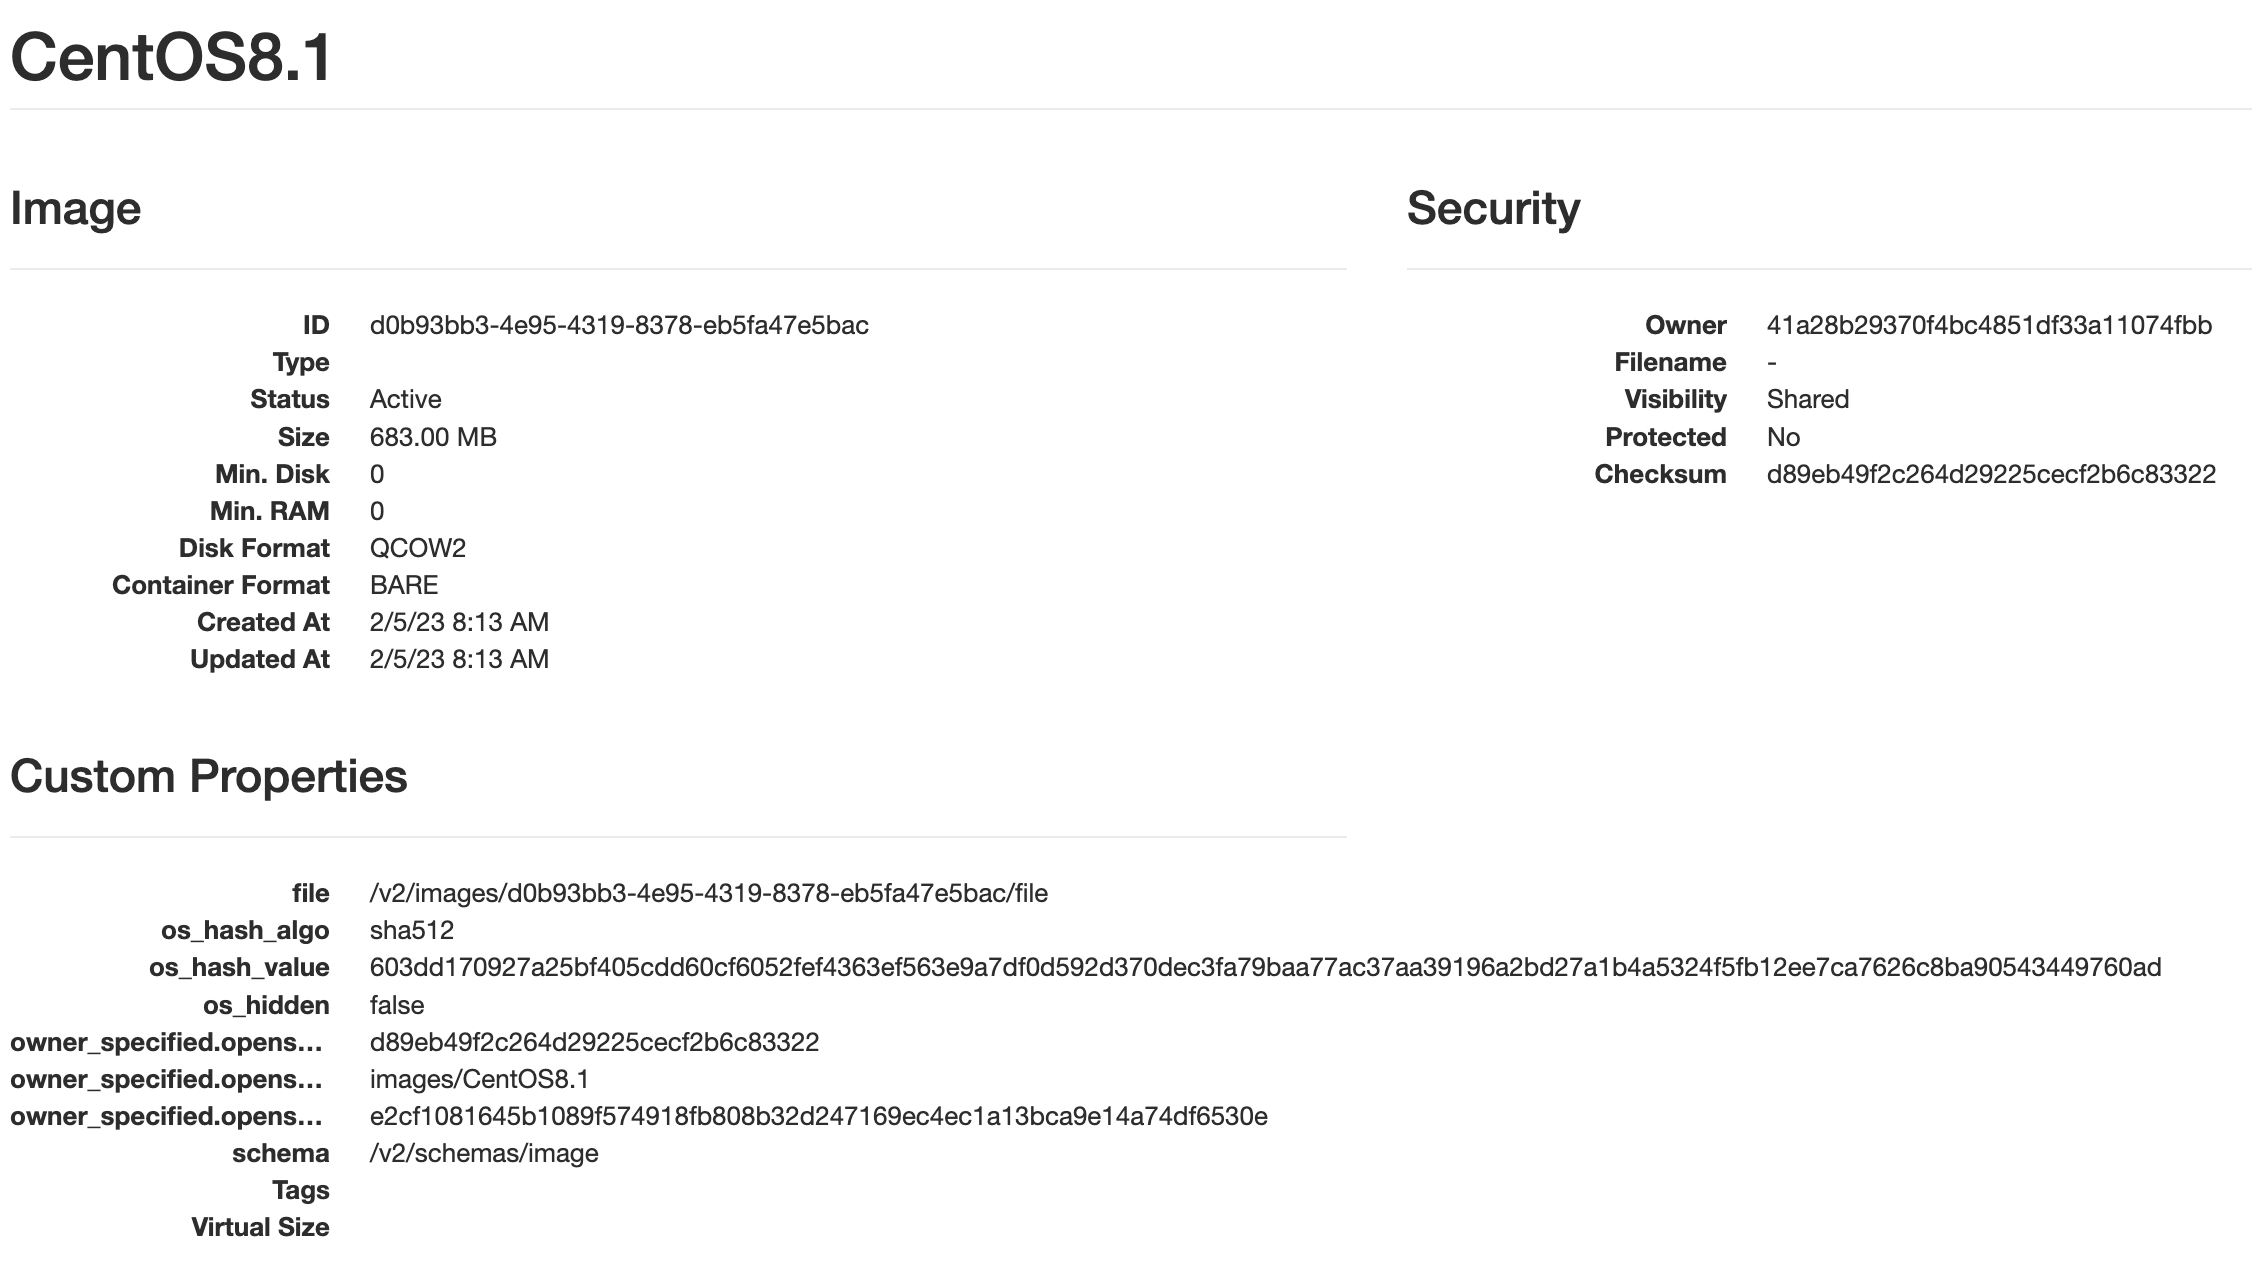
이번 자료에서는 CentOS 8버전을 사용하고자 한다. 이미지 크기가 가장 작은 걸로 선택 하여 다운로드 해본다.
sokoban@k8smaster1:~$ wget https://cloud.centos.org/centos/8/x86_64/images/CentOS-8-GenericCloud-8.1.1911-20200113.3.x86_64.qcow2다음으로 이미지를 생성한다.
root@k8smaster1:/home/sokoban# microstack.openstack image create --container-format bare --disk-format qcow2 --file CentOS-8-GenericCloud-8.1.1911-20200113.3.x86_64.qcow2 CentOS8.1이미지 생성 에러 처리
[Errno 13] Permission denied: 'CentOS-8-GenericCloud-8.1.1911-20200113.3.x86_64.qcow2'위와 같은 이미지가 나올경우에는 microstack에서 이미지 파일을 읽을수 있는 위치에 넣어 주어야 한다.
다운로드 받은 이미지 파일을 /var/snap/microstack/common/images 로 이동한 다음에 명령을 내려 준다.
위와 같이 생성된 이미지를 인스턴스로 띄울때는 아래의 명령어로 띄울수 있다.
microstack launch CentOS8.1 -n test2 -f ma.small
이미지의 기본 지식
QCOW2 형식의 가상 머신 스토리지
RAW
기타
Microstack 설정 파일
만약 설정 파일을 변경해야 할 일이 있다면 Microstack 설치이후 설정 파일은 아래의 위치에서 찾을수 있다.
/snap/microstack/245/etc
Microstack 재시작 하기
재시작이 필요한 경우 아래와 같은 명령어를 이용하여 재시작 할 수 있다.
systemctl restart snap.microstack.nova-compute.service
Microstack 삭제하기
삭제가 필요한 경우 아래의 명령어로 삭제 할 수 있다.
sudo snap remove microstack
Microstack Error 들 모음
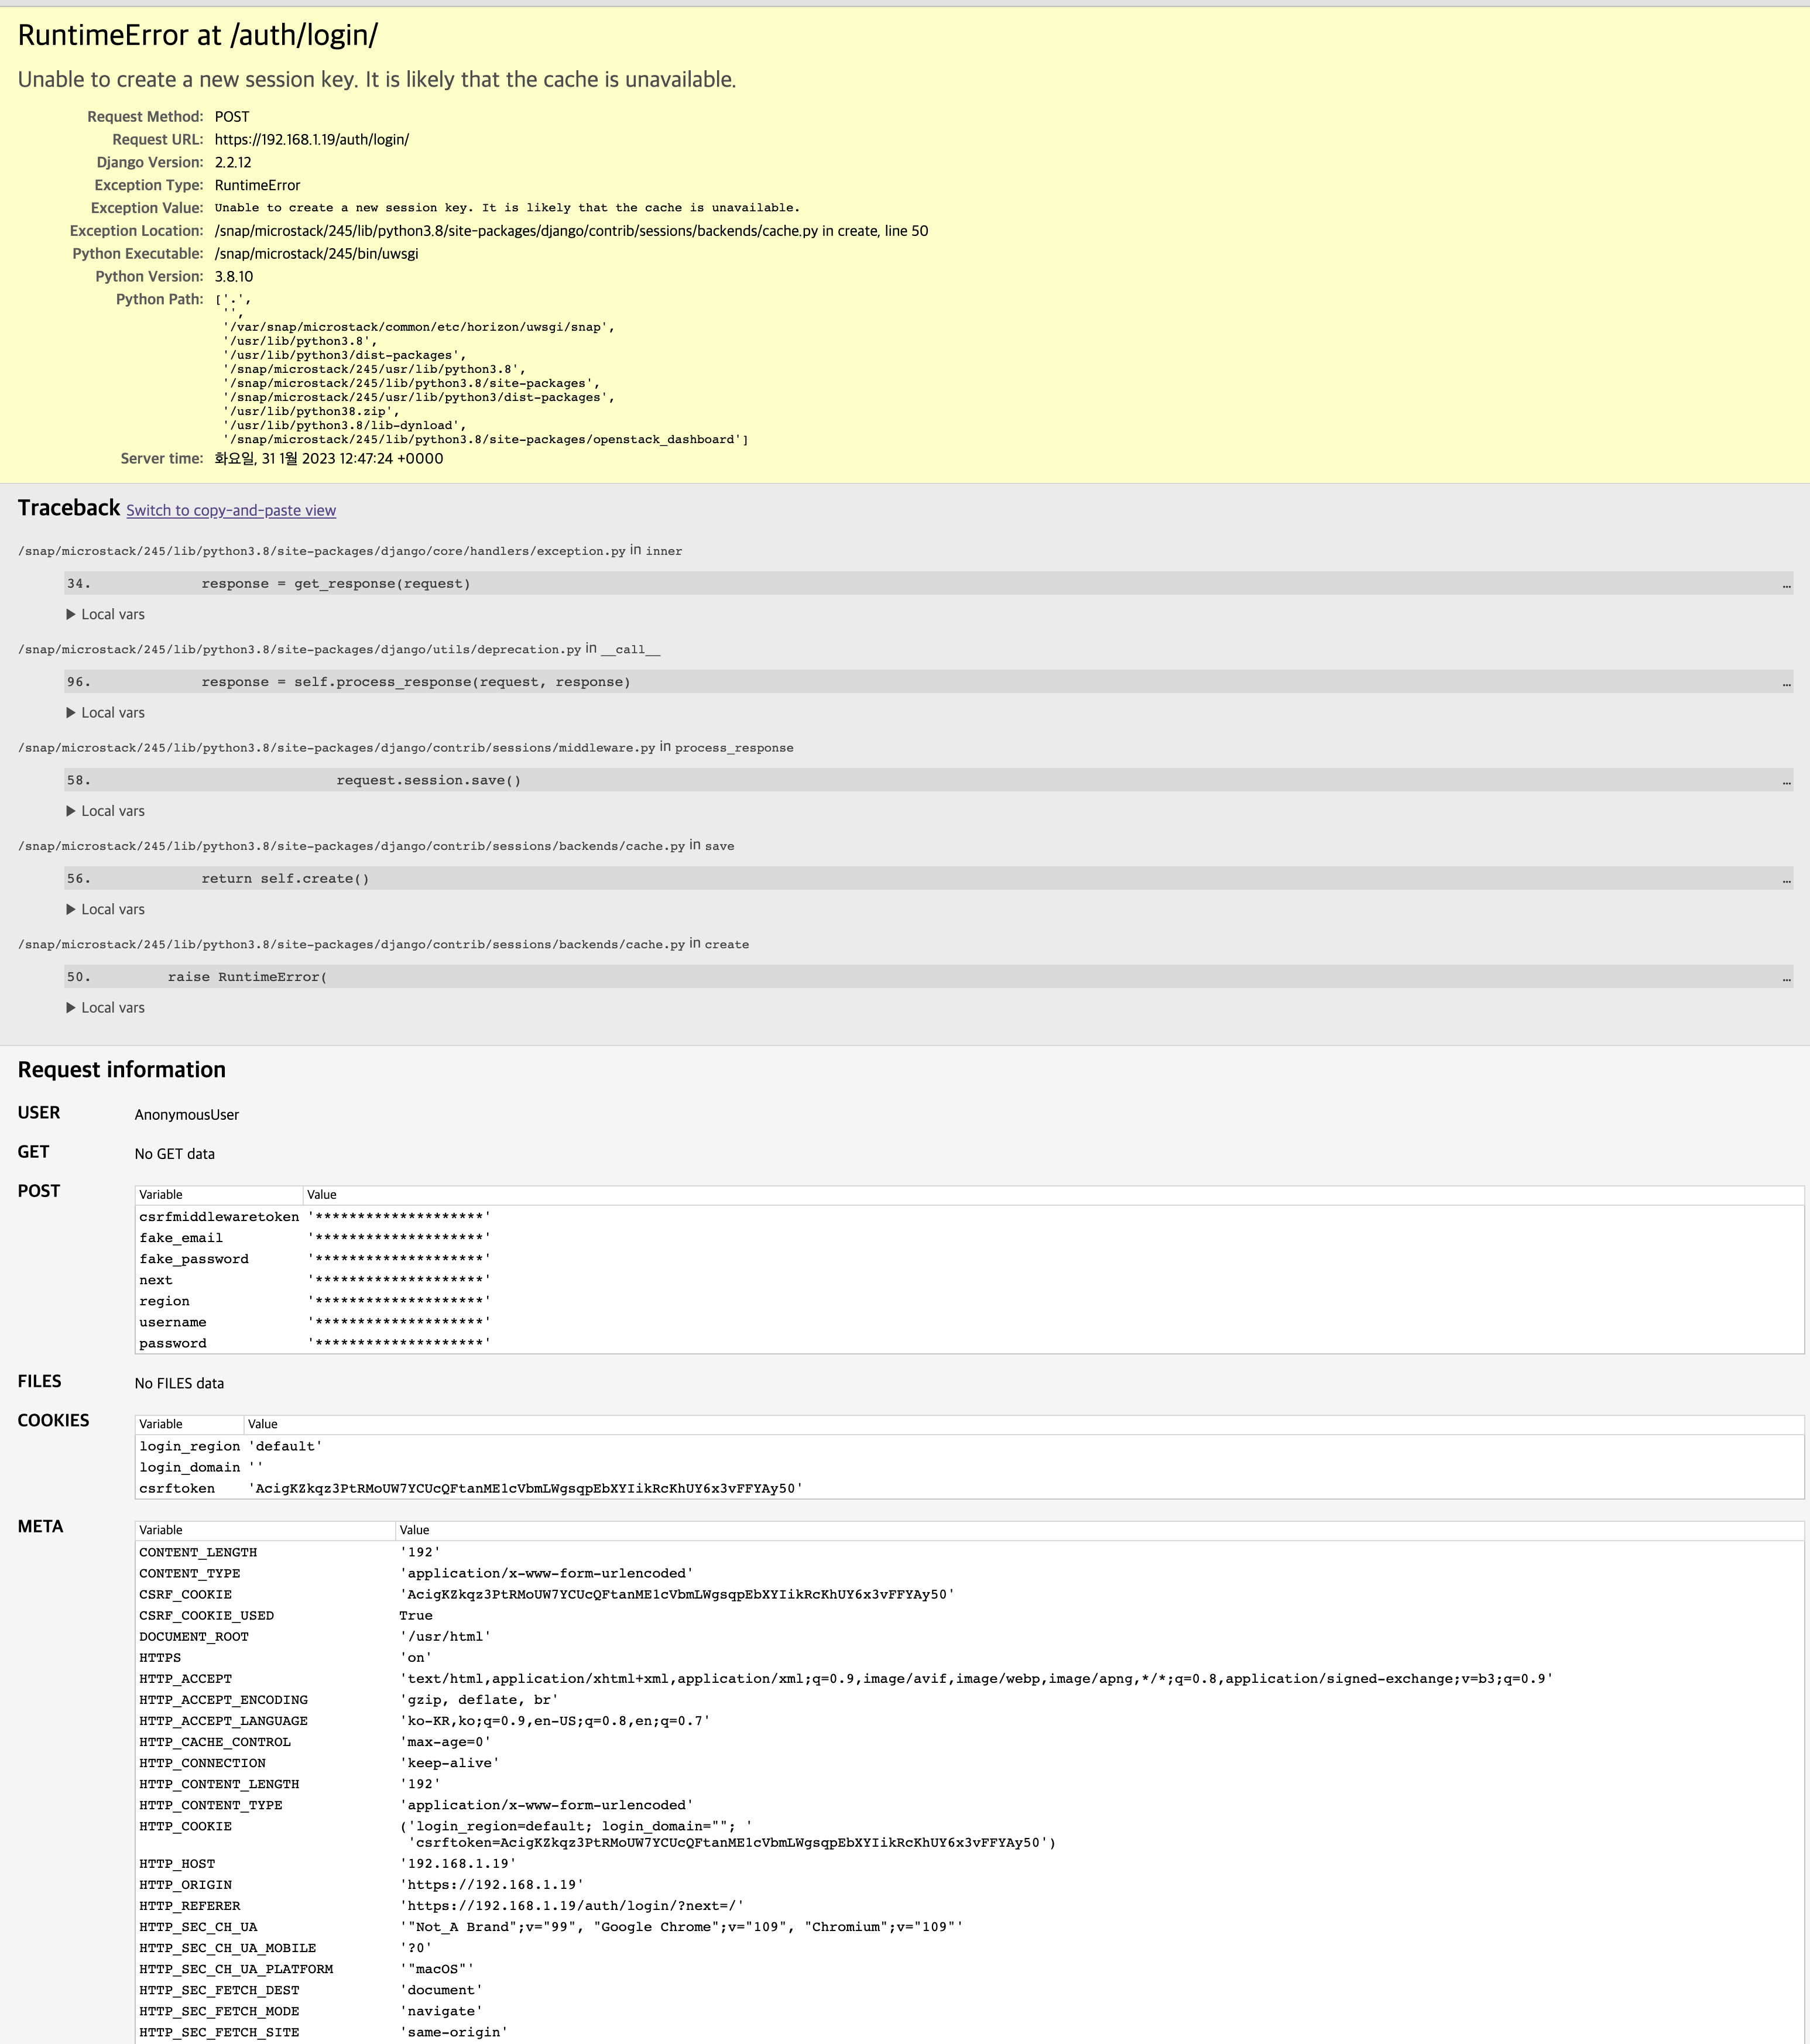
1. Unable to create a new session key. It is likely that the cache is unavailable. 에러
OpenStack중에서 memcached에서 발생하는 에러이다. 발생하면 VM을 재시작 하는것으로 해결은 가능하나 근본적인 해결책은 아님
VM의 suspend 모드를 자주 사용할 경우 세션키의 문제로 발생함
Error: Failed to perform requested operation on instance "test2", the instance has an error status: Please try again later [Error: Build of instance d699f986-24f3-485d-8063-ef46b64736d2 aborted: Volume cbad7ea8-a247-4c75-bf92-58eccfb10cb8 did not finish being created even after we waited 28 seconds or 10 attempts. And its status is error.].
Error: Failed to perform requested operation on instance "test2", the instance has an error status: Please try again later [Error: Build of instance 8ee77d2f-6341-4251-86eb-86683816594b aborted: Volume 527b54e7-9de0-47e6-8adc-0a1ab51cf14c did not finish being created even after we waited 3 seconds or 2 attempts. And its status is error.].
Microstack - Invalid image identifier or unable to access requested image. (HTTP 400)
I can create volumes and virtual machines if i leave the create new volume box unticked, then i create a volume and map it manually and it works fine. But if i try and create a volume from an image it errors out giving me - Invalid image identifier or unab
discourse.charmhub.io
참고 사이트
DevStack의 설치는 아래를 참고한다.
https://docs.openstack.org/devstack/latest/
DevStack — DevStack documentation
DevStack DevStack is a series of extensible scripts used to quickly bring up a complete OpenStack environment based on the latest versions of everything from git master. It is used interactively as a development environment and as the basis for much of the
docs.openstack.org
https://www.youtube.com/watch?v=0ds2Bs9CZss
https://discoposse.com/2014/01/26/openstack-havana-all-in-one-lab-on-vmware-workstation/
OpenStack Havana All-in-One lab on VMware Workstation | DiscoPosse.com
With all of the popularity of OpenStack in general, and specifically with my other posts on deploying the Rackspace Private Cloud lab on VMware Workstation, I think it’s time for me to update with a new lab build for everyone. This lab build process will
discoposse.com
https://delightwook.tistory.com/40
오픈스택 연구하기 : Devstack으로 오픈스택 빠르게 설치하기
오픈스택 연구하기 : Devstack으로 오픈스택 빠르게 설치하기 안녕하세요 김민욱입니다. 이번 포스팅에서는 Devstack을 이용해서 오픈스택을 빠르게 구축해보겠습니다. Devstack은 오픈스택을 설치하
delightwook.tistory.com
https://opendev.org/x/microstack
microstack
OpenStack in a snap!
opendev.org
'시스템일반 > 클라우드 시스템' 카테고리의 다른 글
| S3 정적 웹 페이지 서비스의 성능은 ? (1) | 2022.04.03 |
|---|---|
| AWS S3를 이용한 정적 웹페이지 서비스 (0) | 2022.04.02 |